If you have multiple admins, developers and contractors making changes to your Salesforce Org on a regular basis, one of the biggest challenges you face is how to manage the changes you are making. If you are lucky enough to have an Architect or a team to help review changes, it’s still not easy for them to review multiple change requests while trying to keep track of which metadata components are being added or modified and which requirements these changes are meant to satisfy. For SFDC teams with complex configurations, creating a review process and knowing how and what to review can be a serious challenge.
I understand that tools like Copado, Flosum, Gearset and others can provide options to assist you in this process, but what if you don’t have the budget for a CI tool? What if you don’t have an established review process for your team to follow? This post will provide you with some tips on how to set up a review process and, as an added bonus, I’ll also give you a toolkit that you can download to help you satisfy your documentation needs.
Creating a Process for Review
It’s inevitable… as your Salesforce usage grows, so does the complexity of your Org. The time it takes to deploy changes and the risk of breaking something in your Production (live) Org increases. If you have multiple teams making changes, this only adds additional complexity. So, to make this process more sustainable, you need to agree to use a standard template, like an Excel spreadsheet, where your teams will track the components that they create or modify for any given deployment. The ultimate goal here is to have a easy to read document that will help you with your review and deployment processes. I call this the “Solution Summary”. (Not only is this document great for review purposes, but it makes a fantastic deployment checklist. Use it when you are creating your deployment packages to make sure you don’t forget anything!)
Here are some tips to starting your review process…
- Create your Solution Summary Template (I’m giving you one of mine to start with. More on this later)
- Have each team member use the template to document their component list and share their Solution Summary with your team. (My team has an “Issue” process within SFDC where we upload the Solution Summaries to the Issue records they are related to. That way we can easily go back to an Issue and see what was done to solution the requirement.)
- Identify your Review Team. Review Teams can be comprised of Architects, developers and subject matter experts who will review change requests on a regular basis. (We are on a weekly release cycle, so my team meets once a week (at a minimum) to review new requests and existing requests that are still in development.)
- It is imperative that admins and developers submit all change requests to the Review Team for review. It’s amazing how even a poorly configured field can have a negative impact on your Org. In my opinion, there is no such thing as a minor change that shouldn’t get some level of review.
- Remember, the key to this process is to have regularly scheduled review meetings during your sprints where the development teams explain requirements and proposed solutions. This allows the Review Team to stay up to speed on what is happening in your Org and it also allows them to give guidance for following best practices in Salesforce.
Guidelines for Architectural Review
So, now that you have a review process setup, how about some guidelines for your team to follow during your review meetings?
It’s crucial for Architects to understand the bigger picture when it comes to the potential impact of any changes made in a system. Not only do you need to comprehend the current state of your Org, but you also have to understand the planned “future state” of your Org so that you can make sound decisions on the best path forward. Clarity on user stories and the requirements being submitted for a solution is a good starting point for any review.
Architects should always take a close look at the changes being requested and ask themselves (and the team) the following questions:
- Do you understand the requirement? Make sure that the Development Team states the requirement clearly and that the Review Team really understands it.
(ASK QUESTIONS UNTIL YOU TRULY UNDERSTAND!!) - Is the solution being presented following Salesforce best practices? Remember, there can be several different ways to solution a requirement in SFDC. Some are clearly better than others. It’s up to the Review Team to guide the Development Team to consistently use the most suitable and sustainable approach.
- How scalable is this solution? Will the addition of this new field, component and/or process help or hinder the performance of your Org in the long run?
- Will this new component/process stand up to bulk uploads and avoid hitting governor limits? Proper configuration will save you a lot of headaches down the road.
- How secure is this change and does it expose sensitive data to users who either don’t need access to it, or shouldn’t have access to it?
- If the proposed solution includes custom code, has the option of using a “point and click” solution (like flow) been properly evaluated? What are the reasons for the decision to use code and what are the trade-offs in maintenance vs. performance when you decide to use code?
A Guide to the “Solution Summary” Document
A huge part of the review process is documentation. Good documentation is vital to the ongoing health of your Org. To be honest, when I first started, I wasn’t very good with documentation. I noticed that one of our contracted development partners used a spreadsheet to track their work on various projects they did for us. I liked it so much that I “borrowed” 😇 their approach and made a bunch of modifications to make it more robust and suited to our needs. I am providing you with an early version of my Solution Summary Template so you can customize it and make it your own. (Or, feel free to use it just like it is!)
NOTE: I am constantly updating and modifying this template. The more I work with it, the more adjustments I make. It is far from perfect. Just consider this a foundation for you to build on.
Here is an overview on how this Solution Summary Template works.
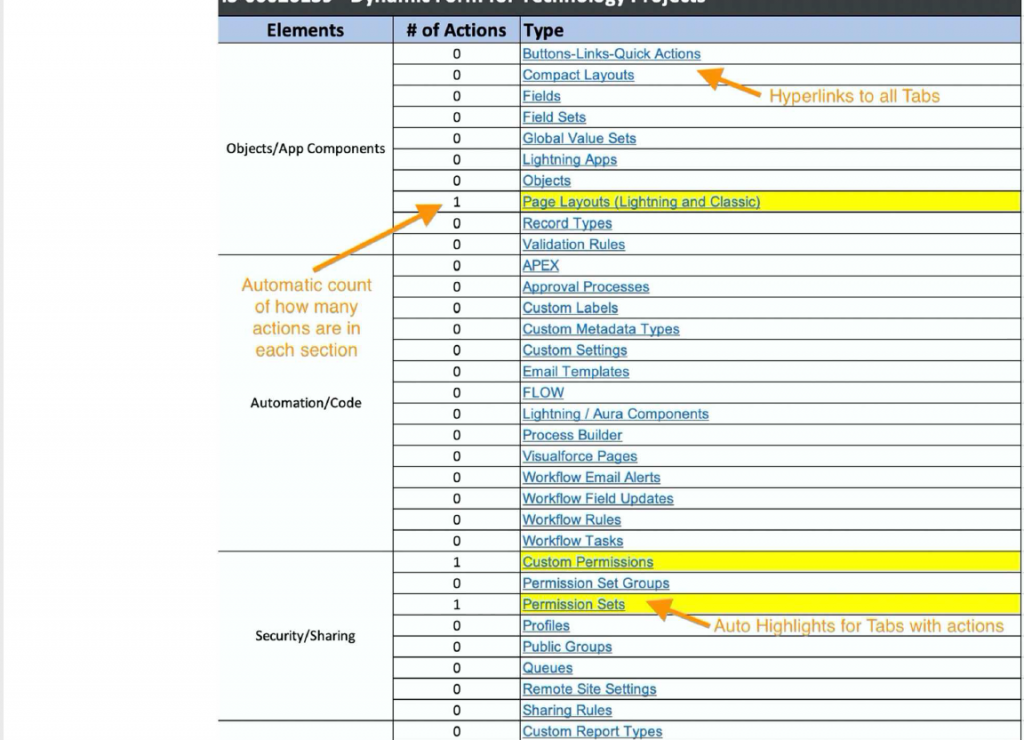
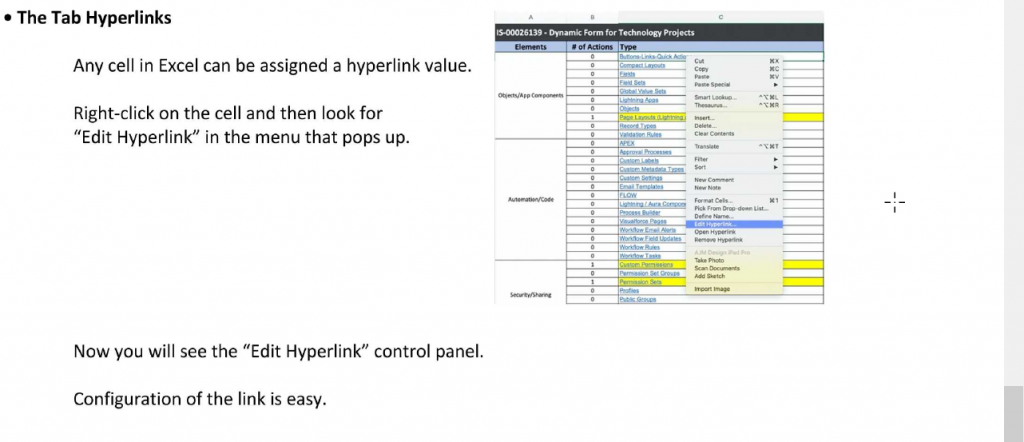
The Summary Tab – Metadata Documentation at your fingertips!
This is your solution’s index. From here you can jump to any section of the document with a single click. Use the first row to “Name the Change” you are documenting. (We use a combination of Issue record numbers and a description of the Issue the change in the system is meant to solve.)
The ” Elements” column helps to group various metadata types into sections to make them easier to find. The “# of Actions” column keeps a count of the number of “Actions” (New, Update or Delete) that you have in any given tab.
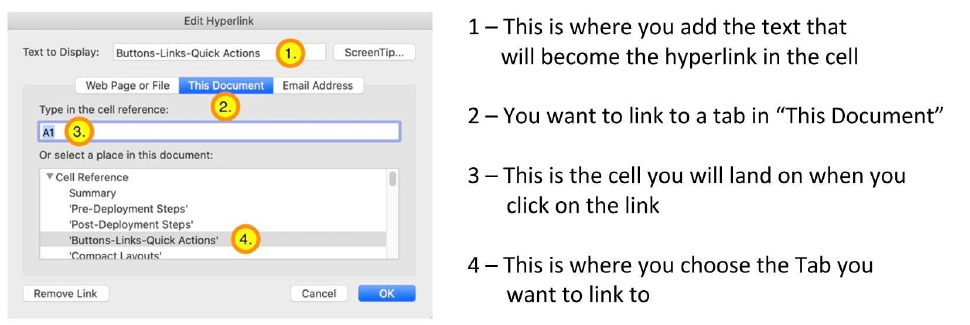
The “Type” column is a list of all of the Tabs in the spreadsheet. The names are also hyperlinks to those tabs. Just click on a name and you jump directly to that Tab. Also, if that Tab has an “Action” set in column B, the cell on the Summary Tab will auto-highlight to make it easier to see what types of metadata are being included in this particular solution.
Metadata Tabs – Track your changes by Metadata Type… the more details you capture here, the better!
The ” Action” column (B) is where you define if you are adding “New” metadata, doing an “Update” to existing metadata, or getting rid of unneeded metadata with a “Delete“. Each cell in column B is actually a little drop down menu with these values defined. Just click and select the value you want to use. (These cells are validated and only these values are acceptable.)
Be sure to gather as much detail as possible about your changes. What you are doing may seem obvious now, but a year from now you probably won’t remember why you made these changes. Future You will thank Current You for being super-detailed here! Each Tab has one (or more) “Return to Summary” links built into the top row. This makes navigating around this large spreadsheet a whole lot easier. Look at the below screenshot for some pointers.
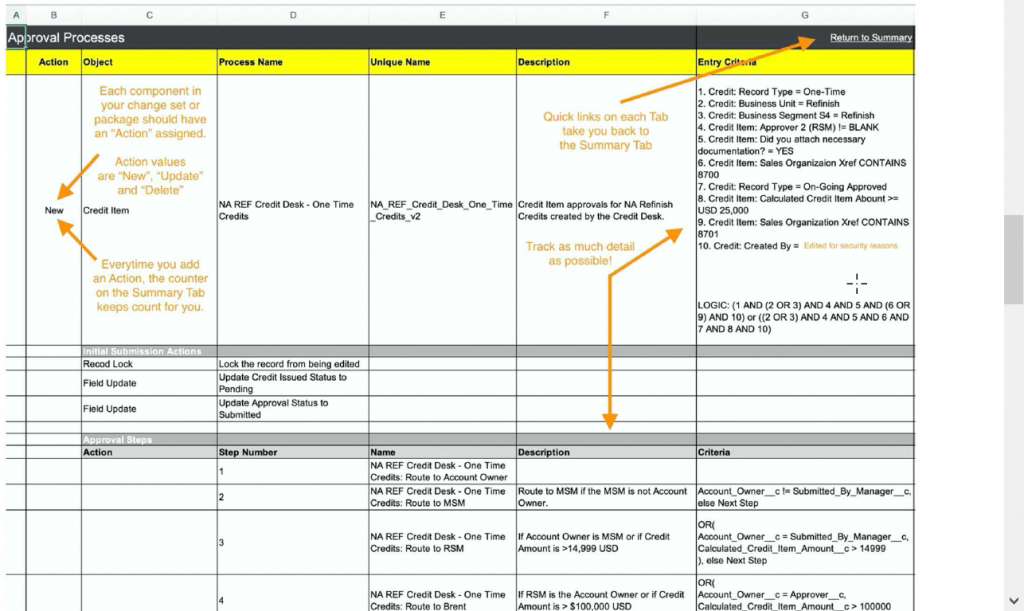
Complex Metadata Links – Links to the metadata make life a lot easier for reviewers. Some metadata types, like Flows, can be too complicated to detail easily in this document. In this case, just add a link that will take you directly to the metadata in your dev box or full copy sandbox. This is a BIG time saver when it comes to reviewing the changes that are being proposed.

Now that you have an idea on how the Solution Summary works, give it a try. Make it a point to use this for ALL changes, big and small. At first it seems like a lot of extra work, but good documentation is well worth the effort!
Under the Hood – A quick look at how I customized this sheet.
If you want to update this spreadsheet for your own use case, here is a quick look at how the various features work.
NOTE: I work on a Mac , so your screen may look a bit different. The underlying functionality is the same. Please look at the below screen shots for guidance on how to customize this tool for your needs.
Feel free to post your comments on any questions you have or email me at buyan@eigenx.com or you can reach out to Andrew at andrew@ajm.design
Download SFDC Architect Template Kit Below
Send download link to:
Please subscribe
Subscribe to our mailing list and get tips to maximize salesforce to your email inbox.
I am honored to have your subscription. Stay tuned for tips to maximize your salesforce investment
Something went wrong.


 for Higher Education which would make you do more, prevent problems and generate more insights.")